WordPress is a blessing and a curse for bloggers and small business owners. The blessing is that every idiot can use WordPress to run a successful blog. The curse is that you feel like an idiot when you start using it. This post will help you feel less like an idiot and more like a blogger.
We wrote this post for our web design clients who want better guidance on blogging. However, if you happen to stumble upon this post, you’re welcome to find whatever use from it.
Table of Contents
- Paste your text into your WordPress
- Why Microsoft Word Makes Blogging In WordPress Easier
- Use H2 Headings For your Primary Headings Throughout Your Blog
- How to Add Images to a WordPress Blog
- Crafting Good Blog Meta-Descriptions
- Add Internal Links to Every Blog Article
- Use A Single Category to Your Blog
- Add Tags to your Blog
- Use a Featured Image
- Conclusion
- References
Paste your text into your WordPress
Blogs consist mostly of words (Shocker… I know). While you’ll occasionally embed videos, images, and the occasional script of code if you’re feeling spicy, words form the center of your blog. However, there are good, better, and best ways to get the words you typed in your word processor (like Google Docs or Microsoft Word) onto WordPress.
Why Microsoft Word Makes Blogging In WordPress Easier
WordPress came into being when Microsoft Word was all the rage. As such, WordPress’ primary blogging platform works seamlessly with Word. So… if you happen to have a Microsoft Office suite, well done. Your life will be a tad easier when formatting your blogs. Simply open your Word document, select all content (I use the Ctrl/Cmd+A shortcut to quickly highlight all content), and paste it into your WordPress post editor.
Most of the formatting will carry over. This includes your H2 and H3 headings, bullets, and even footnotes.
Avoid Excess Styling When Blogging On WordPress
Not everyone uses Microsoft Word. If you’re a Google Docs or Apple Pages person, don’t worry. You’re not forsaken. Here’s what you need to look out for, though.
Check the HTML after you paste your text into WordPress. You can do that by clicking the three vertical dots in the top right of your WordPress post editor and selecting “Code Editor.” What you’ll see might scare you.
Google Docs and Pages love injecting hidden styling. Bold tags nested inside span tags nested inside div tags with inline CSS that does absolutely nothing useful for your blog. WordPress accepts this junk without complaint, and your post will probably look fine on the surface. But underneath, your HTML is a disaster. Messy HTML can hurt your page speed, confuse screen readers, and make future edits a headache.
So what do you do?
Post WordPress Blog This Way If You’re Using Google Docs
Use a plain-text editor as an intermediate step. Notepad on Windows or TextEdit on Mac (set to plain text mode) will strip out all the hidden formatting Google Docs smuggles along for the ride. Then copy from your plain text editor and paste into WordPress.
You’ll lose your formatting. Headings, bold text, and italics, all of it gets stripped when you paste through a plain text editor. You’ll need to reapply those in WordPress manually. That’s the trade-off. A few extra minutes of reformatting beats an HTML nightmare every time.
Here’s what I personally recommend to our clients.
Write your blog content in Google Docs for the drafting and editing phase. Following that, rebuild the post directly in the WordPress block editor. The block editor is surprisingly capable once you get comfortable with it. You can add headings, lists, images, and pull quotes without ever touching raw HTML. The learning curve is gentle, and the payoff in clean code is significant. Some WordPress plugins will clean up pasted HTML for you. But a plugin is a band-aid on a process problem. Better to fix the process.
Ensure your Blog’s Main Headings are Formatted in H2
A great blog writing shows readers a clear heading hierarchy. Your blog post title is automatically an H1. Every main section heading beneath it should be an H2. Sub-sections within those sections get H3s. Sub-sub-sections get H4s, though most blog posts will never need to go that deep. This is especially true if you’re starting out.
Why you MUST format your Blog Headings
Search engines read your heading tags. An H2 that says “How to Add Images to a Blog” tells Google exactly what that section covers. A bold line of text that looks like a heading but is technically a regular paragraph tells Google nothing special. The visual appearance is the same for your reader, but the underlying code communicates very different things to search engines.
Heading hierarchy also helps readers scan. Most people don’t read blog posts word-for-word (I know, I know, it hurts to hear). They scan. They jump from heading to heading, looking for the section that answers their specific question. Proper H2 formatting makes your post scannable, and scannable posts keep people on the page longer.
Use H2 Headings For your Primary Headings Throughout Your Blog
Bold text is not a heading. I see this mistake constantly from our newer blogging clients. Bold text and heading text can look identical on the front end of your website, depending on your theme’s styling. But they are fundamentally different in the code. Bold text is just regular text made darker and heavier. Heading text carries structural meaning. Use headings for section titles. Use bold for emphasis within a paragraph. Mixing them up is one of the most common blog writing mistakes, and one of the easiest to fix.
To change your text to an H2, highlight the line you want to turn into a heading. Look at the formatting toolbar at the top of your text editor. You’ll see a dropdown menu that currently says “Paragraph.” Click that, and a list of options will appear. Select “Heading 2” from the list, and WordPress will immediately apply the correct formatting and HTML tag to that text. If you realize you’ve made a mistake or need a sub-heading, just click the dropdown again and switch it to “Heading 3” or back to “Paragraph.”
How to Add Images to a WordPress Blog
Hear me out: Every blog post needs at least one image. I’d argue most posts need two or three, depending on length. A wall of text with no visual breaks is exhausting to read on a screen, and readers will bounce before they get to the good stuff. However, please at least use one.
WordPress makes adding images simple. Click the “+” button to add a new block, select “Image,” and either upload a file from your computer or choose one from your media library. Drag the image block to wherever you want it in your post.
Keep file sizes under 200KB whenever possible. Large image files slow your page down, and page speed matters for both user experience and SEO. If you’re uploading photos straight from your phone or camera, they’re almost certainly too large. Run them through a free compression tool like TinyPNG or Squoosh before uploading.
Relevance matters more than aesthetics. A stock photo of a smiling businesswoman shaking hands adds nothing to a post about, say, how to format headings in WordPress. If you can’t find a relevant image, a screenshot often works better than a generic stock photo. Screenshots are specific. They show the reader exactly what you’re describing. And they cost nothing.
Crafting Good Blog Meta-Descriptions
Meta-descriptions appear beneath your blog post title in Google search results. WordPress doesn’t have a built-in meta-description field by default, but if your site is running an SEO plugin like AIOSEO (and it should be), you’ll find a meta-description box below your post editor.
Make sure your descriptions are truly descriptive. Because meta descriptions aren’t displayed in the pages the user sees, it’s easy to let this content slide. But high-quality descriptions can be displayed in Google’s search results, and can go a long way to improving the quality and quantity of your search traffic.
Most bloggers skip this step entirely. They let Google auto-generate a summary by pulling a snippet from the post (usually the first paragraph). Google will do this, sure. But the snippet it pulls is often awkward, cut off mid-sentence, or completely misrepresentative of the post. Writing your own meta-description gives you control over that first impression.
Aim for 140 to 160 characters. Summarize the main value of the post in plain language. Think of it as a one-sentence pitch for why someone should click on your post instead of the nine other results on the page.
Here’s what a bad vs. decent meta-description looks like for this very article:
Bad Meta Description:
WordPress is a great platform for blogging. Learn more about how to use WordPress for your blog by reading this article.
Good Meta Description:
A practical guide to writing and formatting blog posts in WordPress, covering headings, images, alt text, and meta-descriptions.
The bad version wastes characters, saying nothing specific. The decent version tells the reader exactly what they’ll learn. You want the decent version.
Add Internal Links to Every Blog Article
Internal links point to other pages on your own website. They might link to another blog post, a service page, a product page, or a landing page. The key is that they keep readers on your site rather than sending them elsewhere.
Even Google’s SEO Guidelines use bold, clear language regarding the importance of internal links:
Every page you care about should have a link from at least one other page on your site. [1]
Every blog post you publish should include at least two or three. More is fine, as long as the links are relevant to what you’re writing about. If you mention a topic that you’ve already covered in a previous post, link to it. If your post relates to a service you offer, link to that service page. The reader benefits from easy access to related information. Your website benefits from internal links, which help search engines discover and understand your site’s structure.
Use Specific Anchor Text in Your Internal Links
Descriptive anchor text matters. Anchor text is the clickable text of the link. Here’s how not to write anchor text. Google’s SEO Guidelines are the alpha and omega of your SEO instructions. One tip from those guidelines is as follows:
Tip: Try reading only the anchor text (out of context) and check if it’s specific enough to make sense by itself. If you don’t know what the page could be about, you need more descriptive anchor text.[2]
Thus, “Click here” is terrible anchor text. To illustrate, let’s say I wrote an article. Then, in said article, I want to embed a link in the text. Ideally, I’d want someone to click on that link, right? Imagine if I wanted someone to click a link to schedule a consultation or read another article. I couldn’t pick more awful anchor text than “CLICK HERE.”
Think about it. It tells neither the reader nor Google where the link leads. Our “guide to writing effective blog posts” is much better. The anchor text should give the reader a clear idea of what they’ll find when they click. It also “tells” Google’s web crawlers that the content the link points to centers on the anchor text. Google’s SEO guidelines recommend the following practices and give some helpful examples. It also illustrates a few bad examples for us.
Google’s SEO Guidelines on Anchor Text for Internal Links
Better (more descriptive): For a full list of cheese available for purchase, see the list of cheese types.
Bad (weirdly long): Starting next Tuesday, the Knitted Cow invites local residents of Wisconsin to their grand re-opening by also offering complimentary cow-shaped ice sculptures to the first 20 customers.
Better (more concise): Starting next Tuesday, the Knitted Cow invites local residents of Wisconsin to their grand re-opening by also offering complimentary cow-shaped ice sculptures to the first 20 customers.[3]
Add internal links to relevant older posts
One last tip on internal links. Go back to your older posts and add links to your newer posts. Internal linking works in both directions. When you publish a new article, spend five minutes finding two or three older posts that relate to it and adding a link from those older posts to the new one. This is one of those blog writing tips that takes almost no time but compounds over months. Your older posts get refreshed with new links, and your newer posts get an SEO boost from the authority of your older content.
With that said, don’t simply add relevant links to your content for the hell of it. An old grifter blogging hack that scammy bloggers employ is simply to stuff the keywords they want to rank for into the anchor text of internal links. Nae Nae. This is evil, and Google says so. Doing this makes you guilty of the sin of keyword stuffing.[4]
Write as naturally as possible, and resist the urge to cram every keyword that’s related to the page that you’re linking to (remember, keyword stuffing is a violation of our spam policies). Ask yourself, does the reader need these keywords to understand the next page? If it feels like you’re forcing keywords into the anchor text, then it’s probably too much.[5]
Make sure they actually help the reader. Again, Google’s SEO guidelines are your Old and New Testaments when it comes to your SEO strategy.
Add A Single Category to Your Blog
Categories help Google understand what your business or website is about. For example, if you’re a college prep consultant, consider adding the category “Admission Guide.” If you’re a mechanic writing a blog on changing tires, you might add the category “Changing Tires” or “Tire Maintenance.”
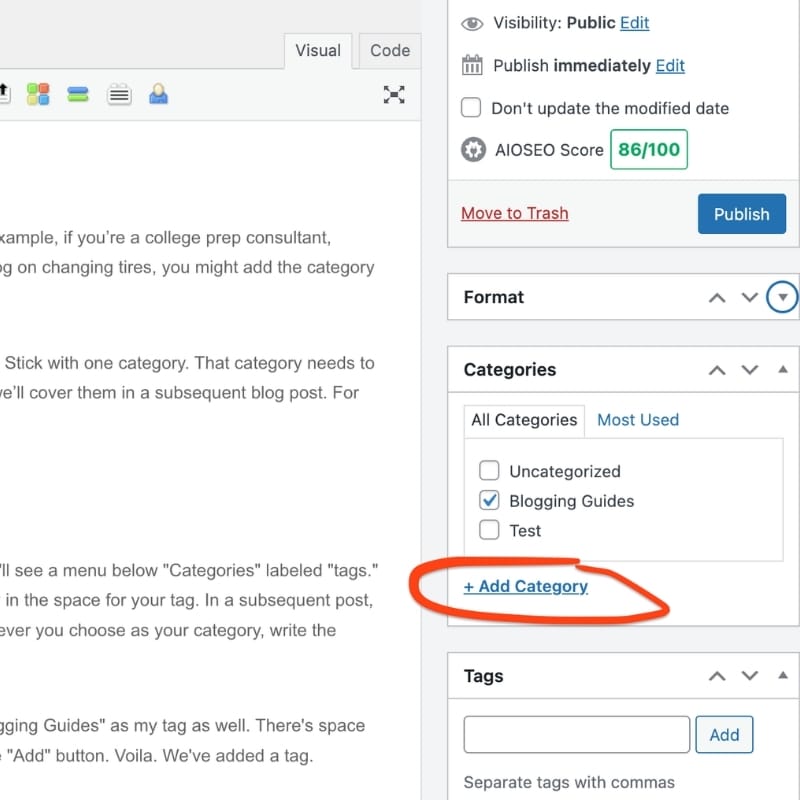
DO NOT ADD MULTIPLE CATEGORIES. I repeat: Do not use multiple categories. Stick with one category. That category needs to be a theme or topic so that all the content fits in. You can add subcategories, but we’ll cover them in a subsequent blog post. For now, as you’re starting your blogging journey, don’t worry about subcategories.
You can add a category to your blog by clicking on the ” + addCategory ” button. Then write your category in.
Add Tags to your Blog
You’ll also want to add a tag to your blog. On the right side of your post menu, you’ll see a menu below “Categories” labeled “tags.” As you’re starting your blog, I’d recommend writing the same text as your category in the tag field. In a subsequent post, we’ll dive into what tags are and why you should use them. In the meantime, whatever you choose as your category, write the same text into your tag.
For example, in this post, my category is “Blogging Guides.” Thus, I’ll choose “Blogging Guides” as my tag as well. There’s space below the “Tags” heading. I’ll type “Blogging Guides” in that space. Then, I’ll hit the “Add” button. Voila. We’ve added a tag.
Add a Featured Image
Your featured image is the digital storefront of your post. It usually appears at the top of the article, on your blog archive page, and when shared on social media. Because it acts as the primary visual hook, Google’s Search Essentials suggests using high-quality images to help your content stand out in search results and Google Discover. Don’t treat it like a decorative afterthought; a strong image makes the article feel finished, professional, and worth clicking.
To add one, look at the right-hand settings panel in WordPress under “Featured Image.” Click it to upload your file or select one from your media library. If you don’t see the panel, make sure you’re viewing the Post settings and not the Block settings. WordPress loves hiding important things in plain sight, because apparently that’s part of the charm.
Choose a Featured Image that’s Relevant to Your Content
Choose an image that actually matches the article. Google’s image guidelines emphasize that images should be relevant to the page’s topic.
- Bad: A random picture of a coffee cup, a smiling office person, or a generic laptop. These don’t tell the reader anything.
- Better: A screenshot of the WordPress editor, a clean graphic about blog formatting, or a visual showing headings and links.
- Best: The featured image should tell the reader what kind of article they’re about to read before they ever see the title.
These rules don’t just apply to your featured images, but to any image you put in your blog.
Keep the File Size of Your Images Lean
Large featured images are the #1 reason blog pages load slowly. Since Google uses page speed (Core Web Vitals) as a ranking factor, a heavy image can actually hurt your search ranking. My blogging mentor put it to me this way: Slow Internet… BAD. Fast Internet. GOOD. The best way to make sure your blog doesn’t slow your readers’ experience or slow their internet is with the format of your blog’s images. Remember the rules below.
Watch your file formats:
- Avoid PNGs: For standard photos, PNGs are the worst for loading times because the files are massive.
- Stick with JPEG: JPEGs are much better for the web; they provide great quality at a fraction of the size of a PNG.
- The “Next-Gen” Option: You might hear about WebP. Google loves this format because it’s even smaller than JPEG. But if you want to keep it simple, a compressed JPEG is perfectly fine.
The 200KB Rule: Always compress your image before uploading. Aim to keep the file under 200KB. If it looks clean after compression, you’ve done your job.
DO NOT Forget the Alt Text to Your Images
Featured images need alt descriptions just like every other image. Alt descriptions are short text descriptions attached to your images. Sometimes called alt text or alt tags, you’ll find the “Alt Text” field in the right-hand settings panel when you click on an image in WordPress. Every single image in your blog post needs alt text. No exceptions.
Alt text serves two purposes. For visually impaired readers who use screen readers, alt text describes what the image shows. The screen reader reads the alt text aloud so the user understands the visual content. For search engines, alt text provides context for images because Google can’t “see” images the way humans do. Even though Google uses advanced AI to analyze images, their official SEO guidelines still emphasize that descriptive alt text is the primary way they understand the subject matter of a photo.
Good alt text is brief and specific. Describe what’s actually in the image. “Screenshot of WordPress block editor showing the heading options dropdown” is good. Other versions are less helpful or just plain lazy:
- “Image” or “Blog picture” (Too vague)
- “IMG_4372.jpg” (Provides zero context)
- “WordPress SEO blog tips writing images featured image post” (This is “keyword stuffing,” which Google warns can make your site look like spam)
Type Alt Text Example Bad (Keyword Stuffing) SEO blog tips, WordPress image settings, and blog post help Good (Helpful & Clear) The WordPress blog editor is showing the featured image settings panel on the right sidebar Think of it like describing the image over the phone. Keep it under 125 characters when possible, and don’t stuff keywords into it unnaturally. If the keyword fits the description naturally, great. If it doesn’t, just describe the image accurately and move on. Google is much more likely to reward a helpful, human description than a list of keywords shoved into a tag.
As an example, here are the alt descriptions I used for the images found in this blog:
- Featured Image: Illustration of a person working at a computer with the text Your Blogging Guide to WordPress.
- Heading Formatting: WordPress editor dropdown menu showing formatting options for Paragraph and Headings one through six.
- Categories Panel: WordPress sidebar showing the Categories section with Blogging Guides selected and the Add Category link highlighted.
- Tags Panel: WordPress sidebar menu showing a text box to add new tags and the currently applied Blogging Guides tag.
Conclusion
That’s the nuts and bolts of posting a blog on WordPress. The process gets faster with practice. After your third or fourth post, many of these now-tedious techniques will feel automatic. When that mastery ensues, you’ll spend more time writing your blog content and less fighting with WordPress.
Which, if you think about it, is exactly how it should be.
Happy Blogging!
-Marc
References
[1] Google. (n.d.). Make your links crawlable. Google Search Central. Retrieved April 9, 2026, from https://developers.google.com/search/docs/crawling-indexing/links-crawlable
[2] Ibid.
[3] Ibid.
[4] Google. (n.d.). Google spam policies: Keyword stuffing. Google Search Central. Retrieved April 9, 2026, from https://developers.google.com/search/docs/essentials/spam-policies#keyword-stuffing